CALL US TOLL FREE | 9am-6pm EST | M-F
LOCATIONS ACROSS THE NATION | TO SERVE THE ENTIRE COUNTRY
Leading Automotive Equipment Dealer Since 1987
CALL US TOLL FREE | 9am-6pm EST | M-F
LOCATIONS ACROSS THE NATION | TO SERVE THE ENTIRE COUNTRY
Leading Automotive Equipment Dealer Since 1987

The 2600 is designed for production work and bending heavier materials up to 3" OD. It meets the standards set by our other models for precise bending and end finishing.
The 2600 provides 85,000 lbs. of bending force in comparison to 58,000 lbs. produced by our other models. It comes standard with a 7-1/2 HP motor. A 3" tube bent to 90-degree in the automatic mode can be completed in 16 seconds.
The ergonomically designed knee control allows the operator hands-free control for quick tube location and securing of the tube. It is also invaluable for prototyping.
The smart automatic mode features an adjustable return-to-home position control. This unique, time saving feature increases efficiency by assuring fast and easy transitions between multiple bends. The automatic depth-of-bend selector ensures precise bending control through the use of an easy-to-read, easy-to-adjust depth-of-bend plate. This feature assures accuracy and repeatability.
Control Wrinkle Die H5531 now available for this model to bend 304 Stainless Steel.
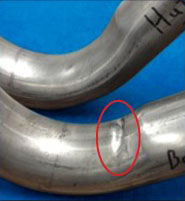
Huth 3" Tube Bend (top on tube) vs. Asian-made
(Notice dimpling on bend in lower sample)
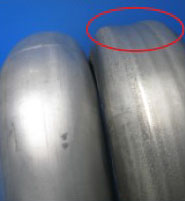
Huth 3" Tube Bend (tube to left) vs. Asian-made
(Notice tube flattening on the right)
* Available with swager/expander – Model 2600
The Easy to Use Pipe Bender
A compression pipe bender is an extremely powerful and versatile tool, but many who have not used one don’t fully appreciate how easy it is to use. When we get people to do their first bend, intimidation tends to fade away and enthusiasm to do more takes over!
There are two ends to the machine … the bending end, and the end-forming end. We’ll focus on the bending end to show just how simple this tool is. There are 3 things you need to know in advance … the distance between bends, the orientation of the desired bend, and the depth of the desired bend.
Plot your distances with a marker: Mark your pipe where you want your bends, working from left to right.
Now turn the bender on … you are almost ready to go: Apply lubrication and set your pipe in the jaws.
Setting a rotation dial to keep oriented: Prior to your 1st bend, setting a rotation dial on the far right end of your pipe, set to zero, will keep you oriented as your progress through multiple bends on each pipe. This is especially important if you are using bending program cards.
Choose Bend radius: Smaller radii give tighter bends, larger radii are more forgiving. Normally smaller tubes utilize smaller radii (larger tubes use larger radii) with a minimum 1.5-2X the tube OD.
Bend to the right depth: Every bender has a depth of bend indicator, and automatic benders let you pre-set the depth of bend. The pointer tells you when you reach your target bend angle.
Basically, that’s it. There are times when a bit more knowledge helps (When do I use a ½ shoe? What do I use for thin-walled material?). But these are compression bender basics for bending with your machine!
"Bending exhaust pipe without cards? Watch this!"


